


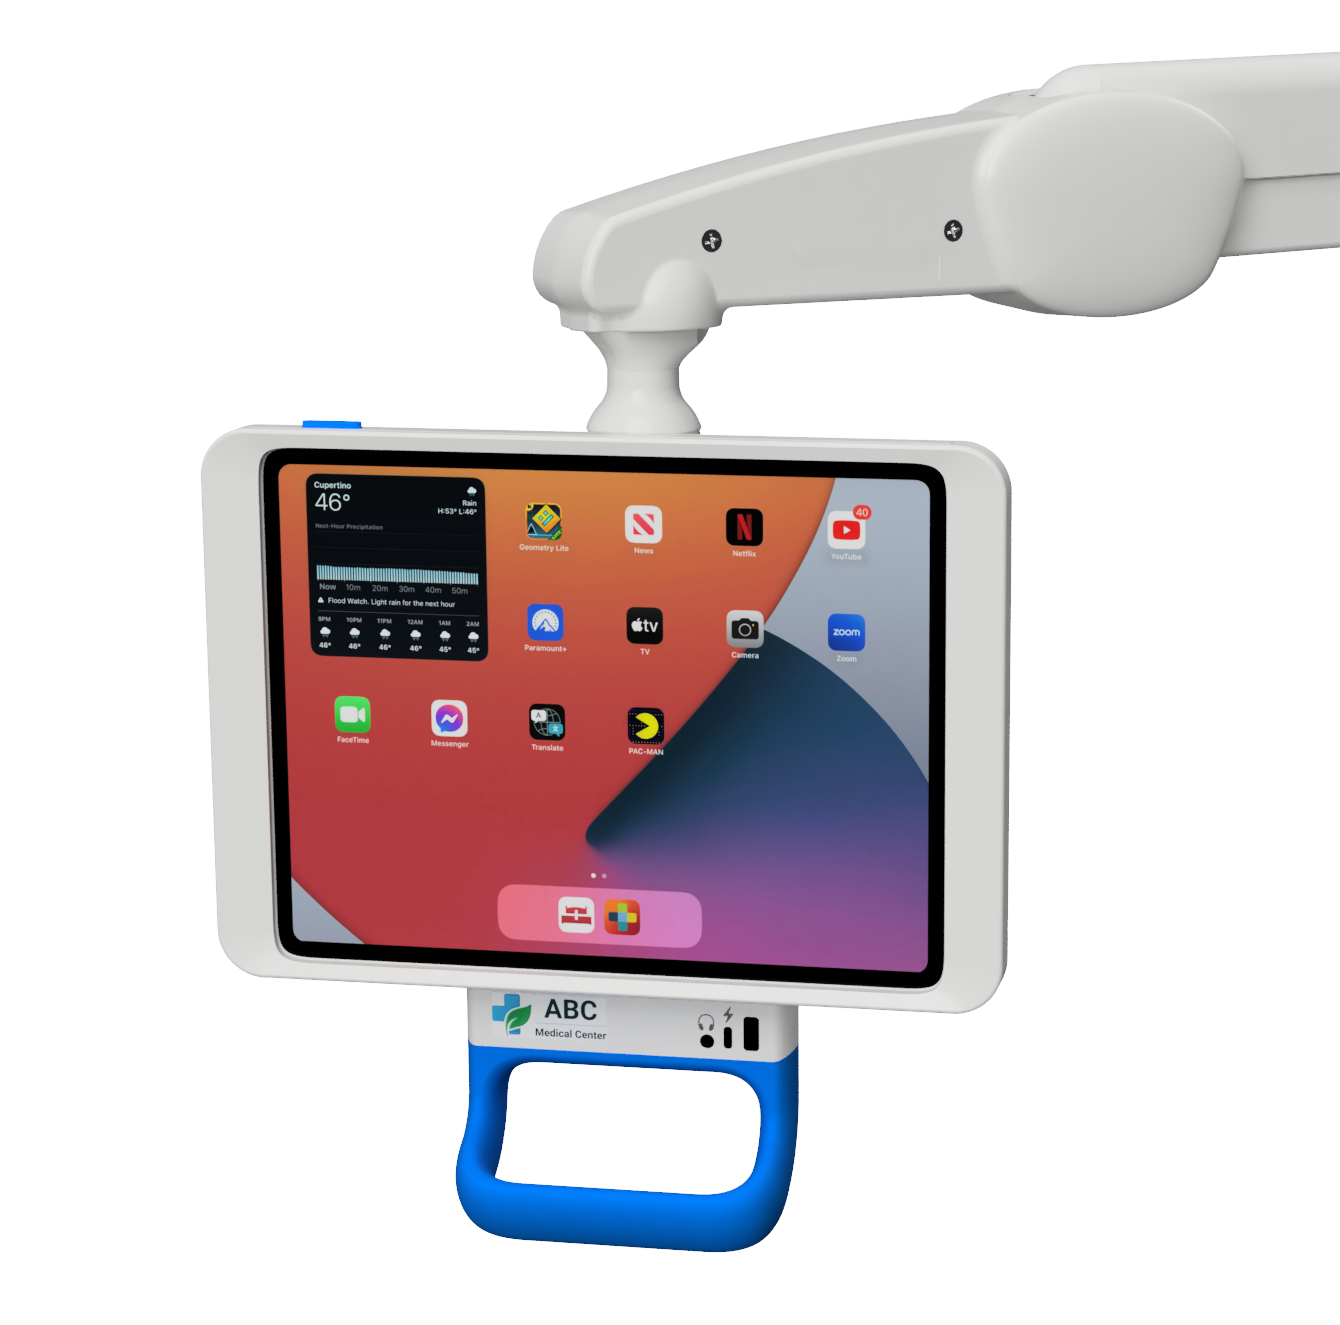

Upgrade existing signage with iPads
Upgrade existing signage with iPads
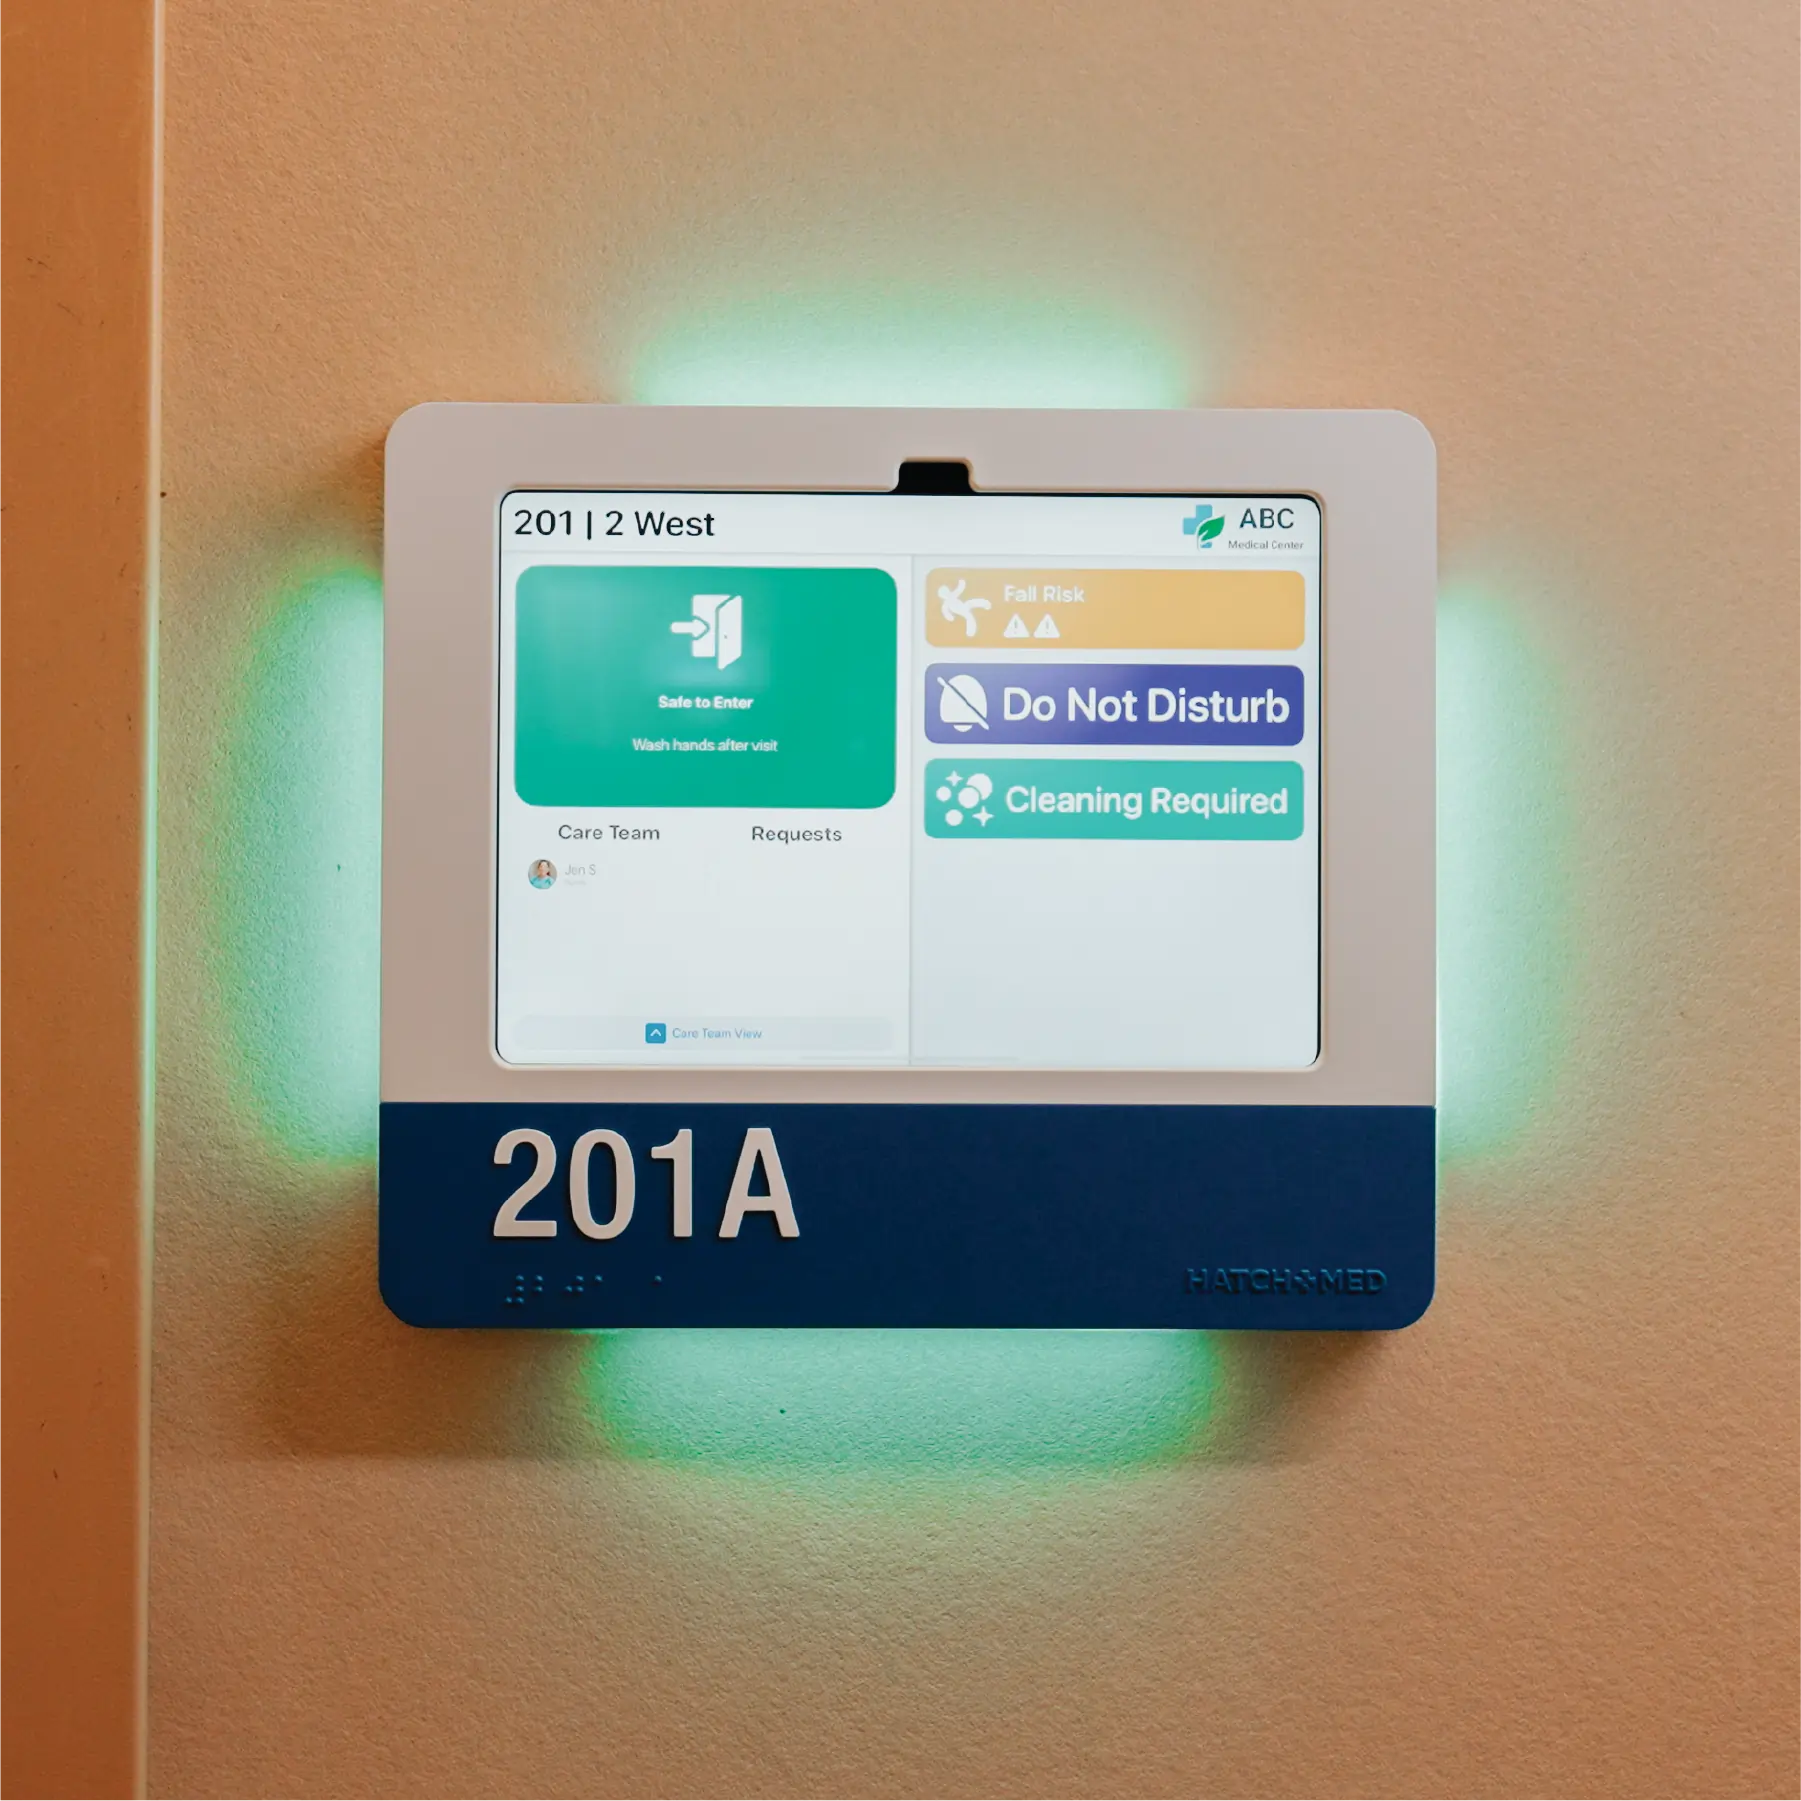
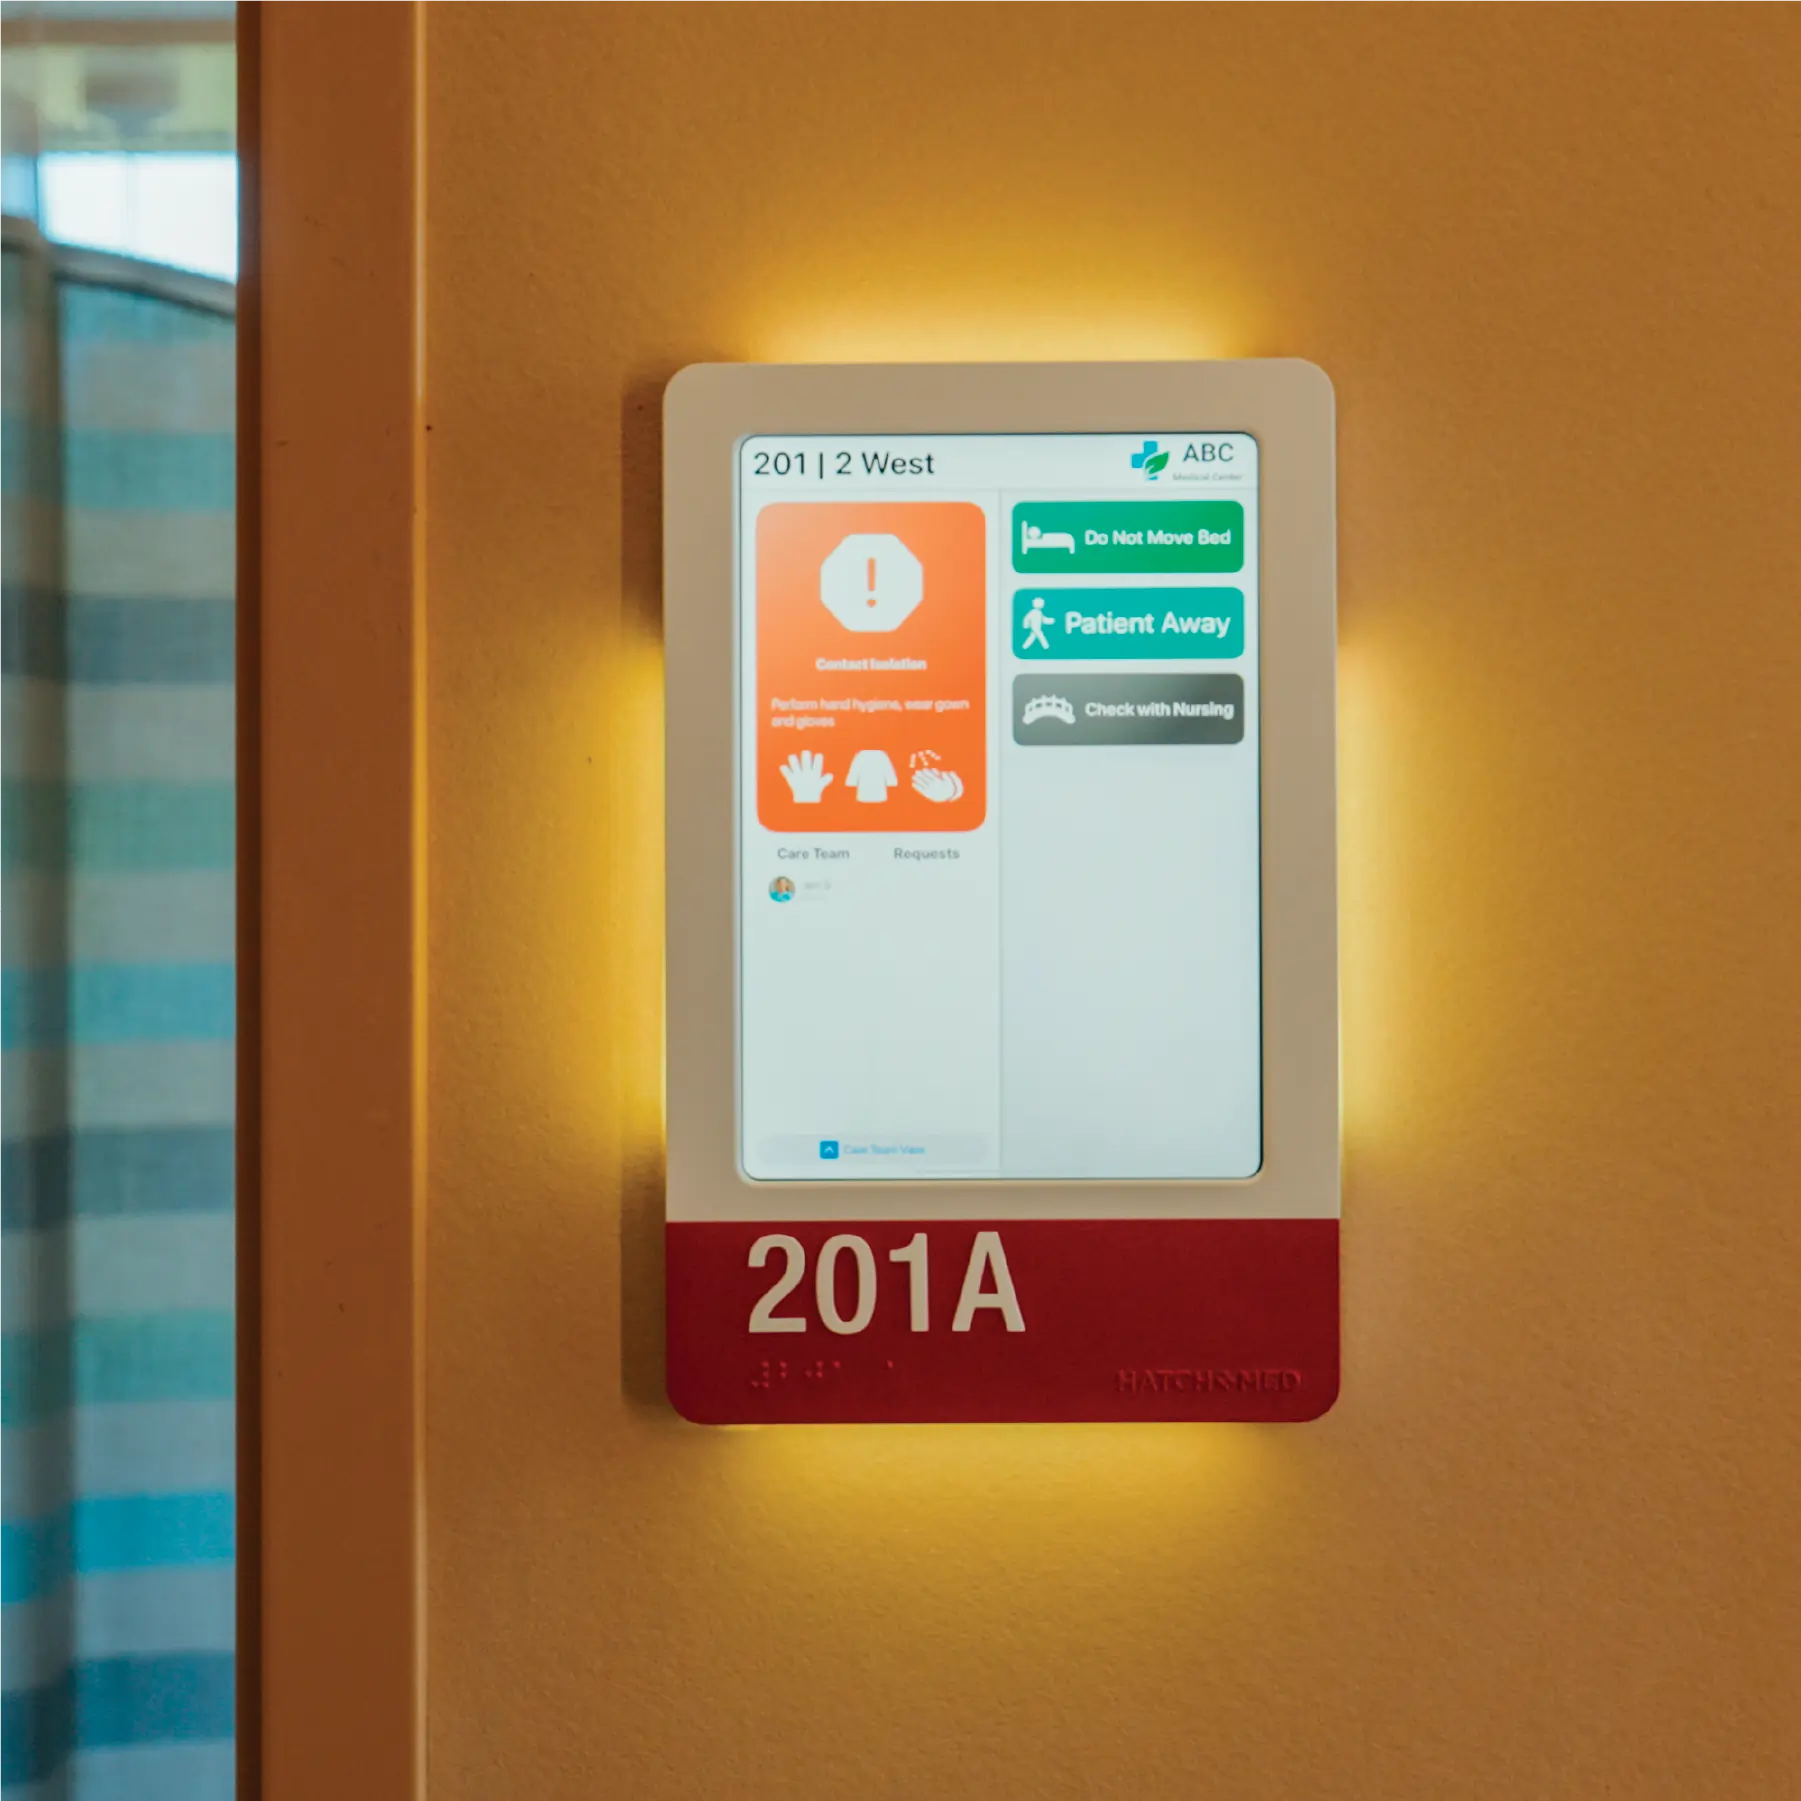
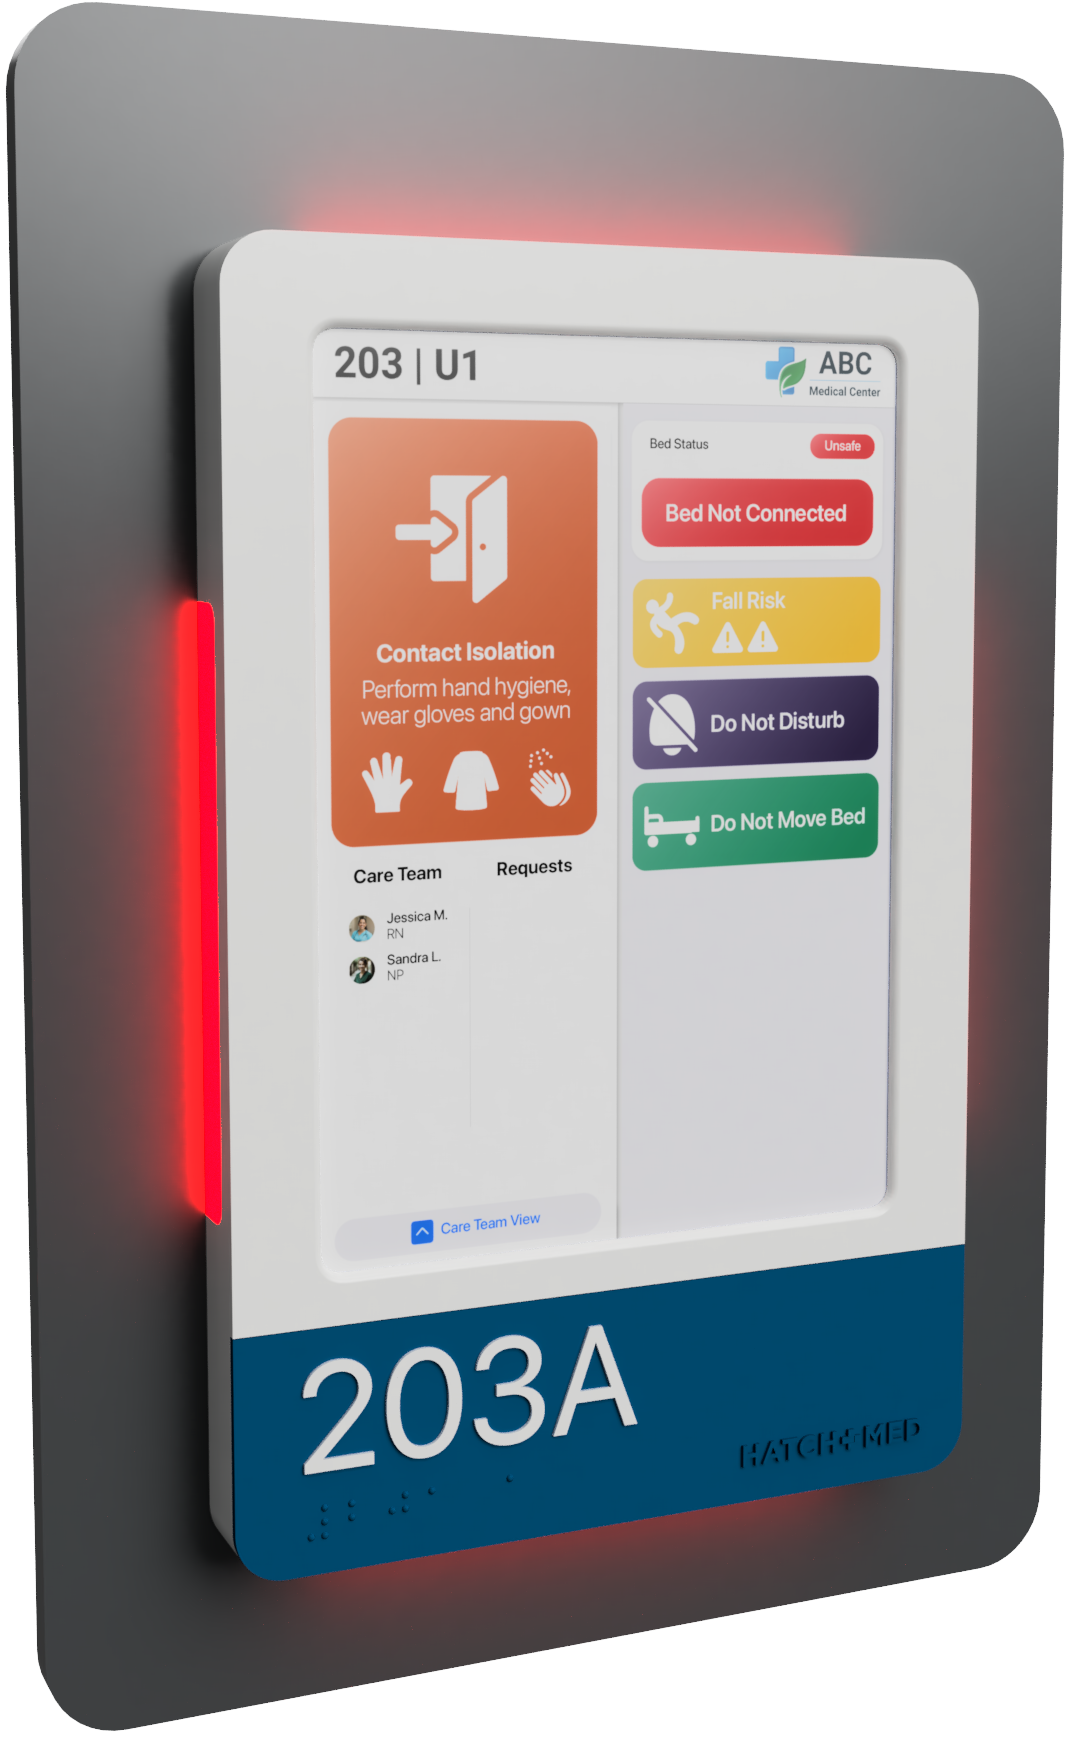
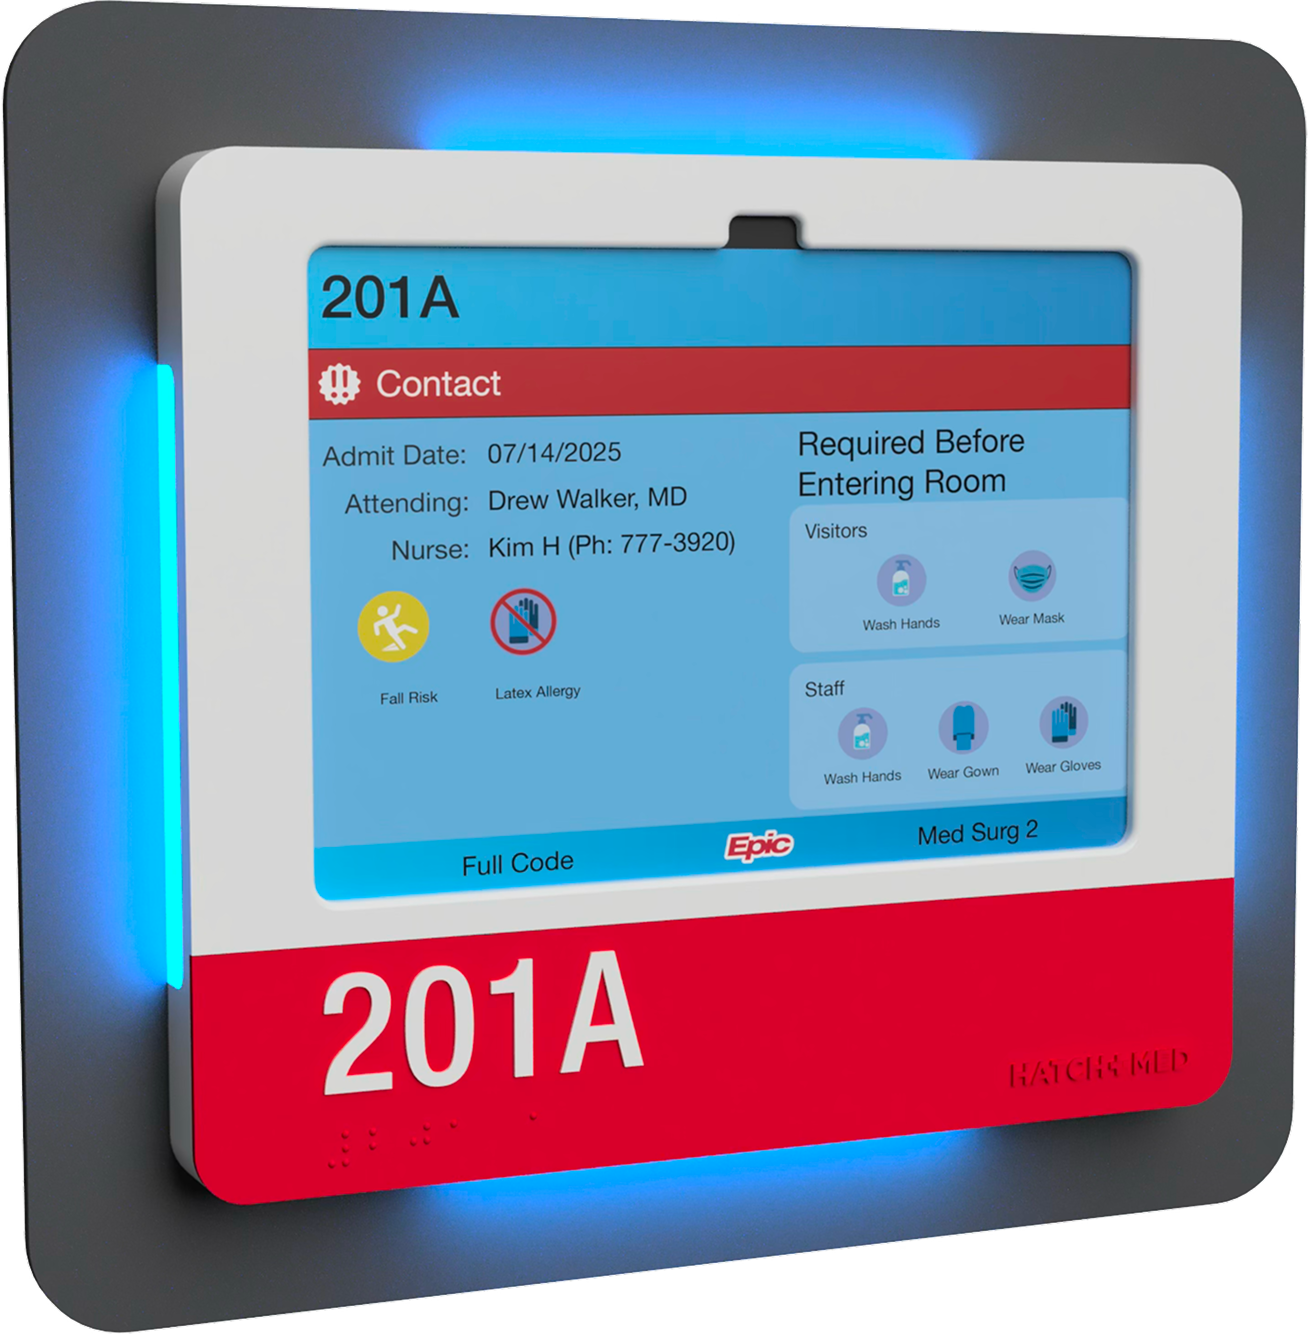
- Continuously synced with the EMR — displays patient status automatically and clears at discharge
- LEDs that do more — signal fall risk, isolation, or in-room presence to prevent accidental entry
- Delivers ROI in under 10 months — saves over 2,300 hours of staff time per year by eliminating manual signage for a 40 bed unit
- Custom-built for your facility — tailored colors, ADA braille & room numbers with a workflow tailored enclosure


HallMonitor Features
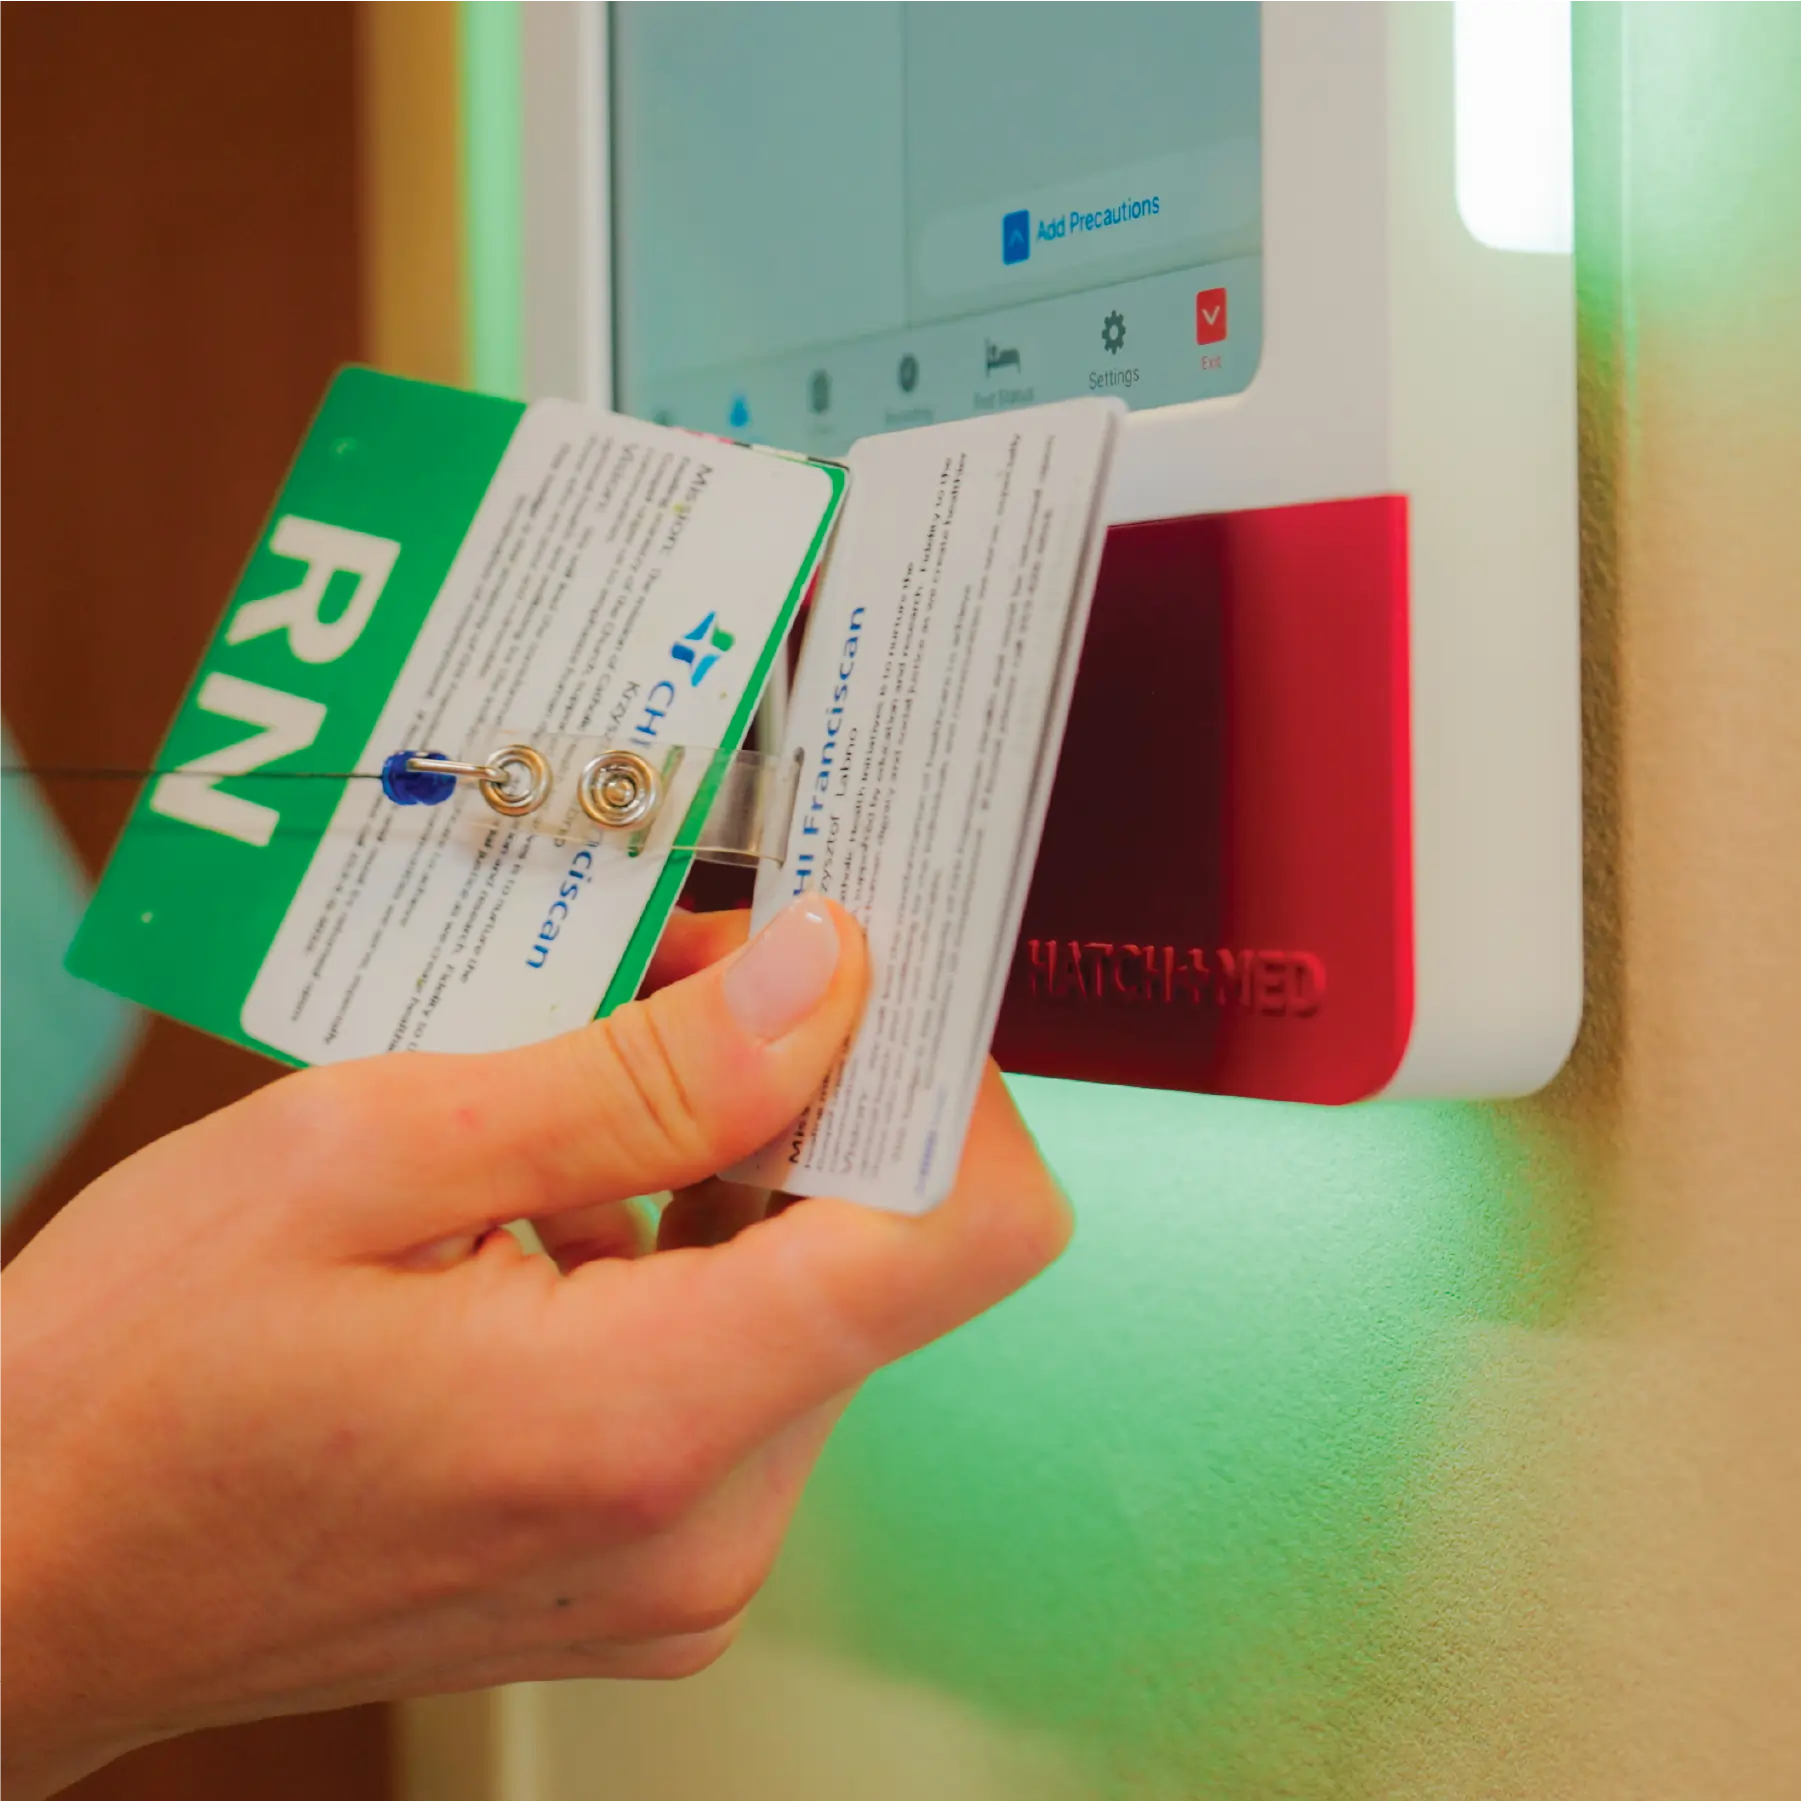
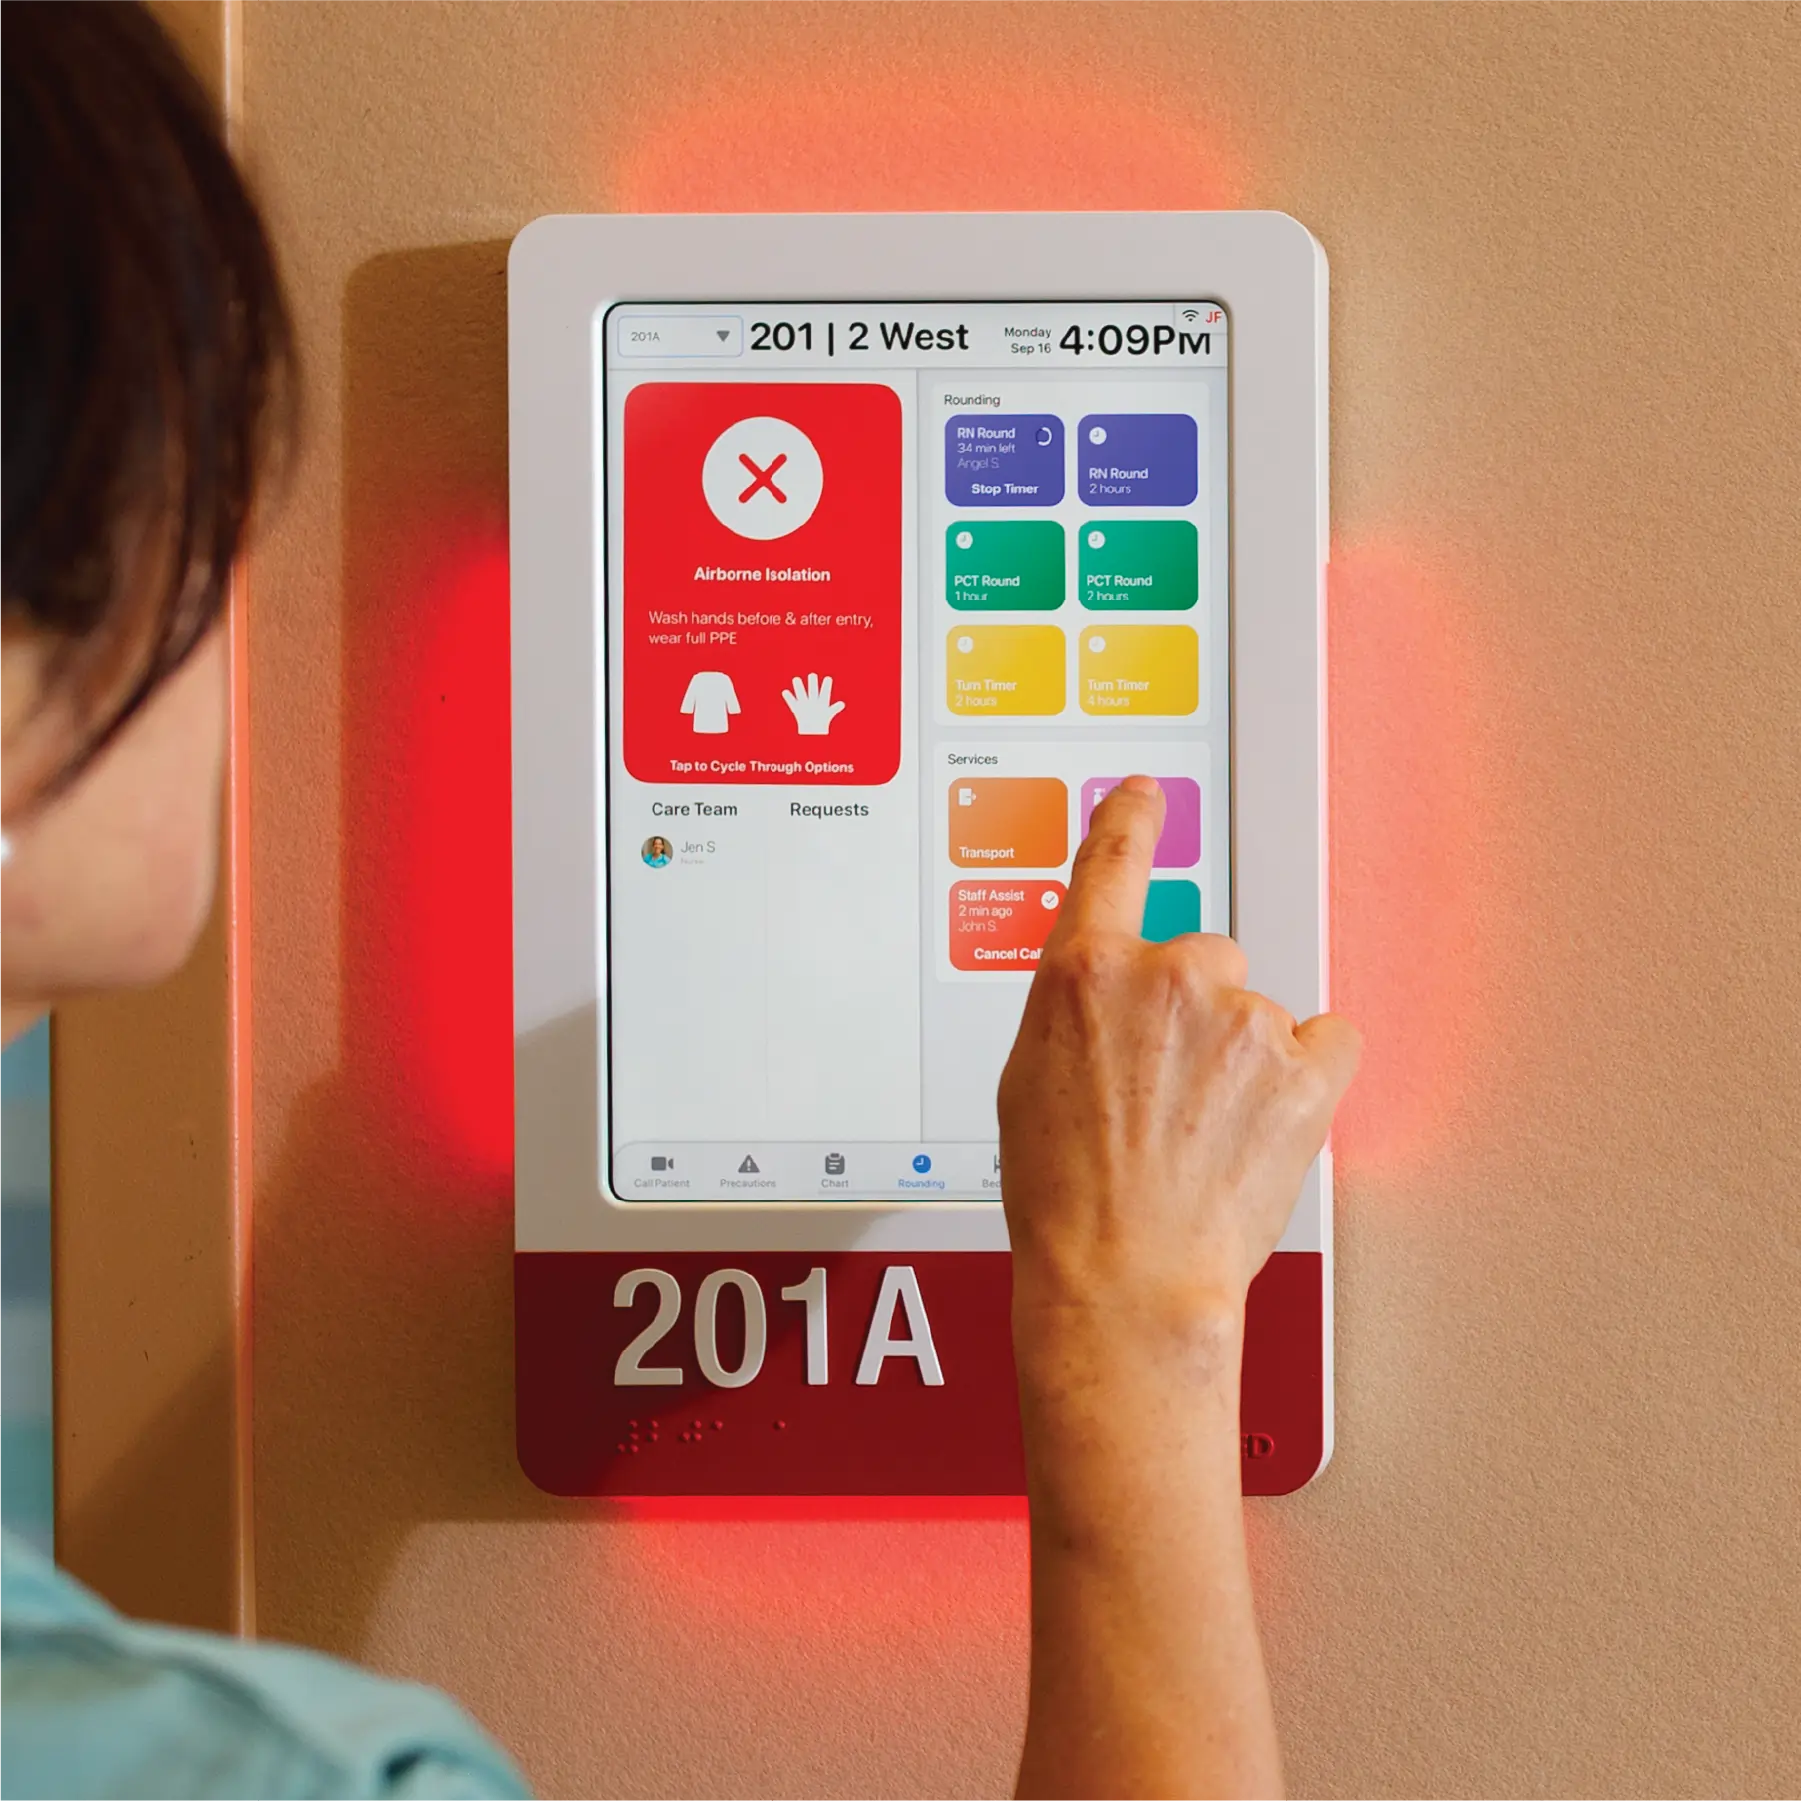
Staff badge reader for authenticated workflows & non-EMR edits
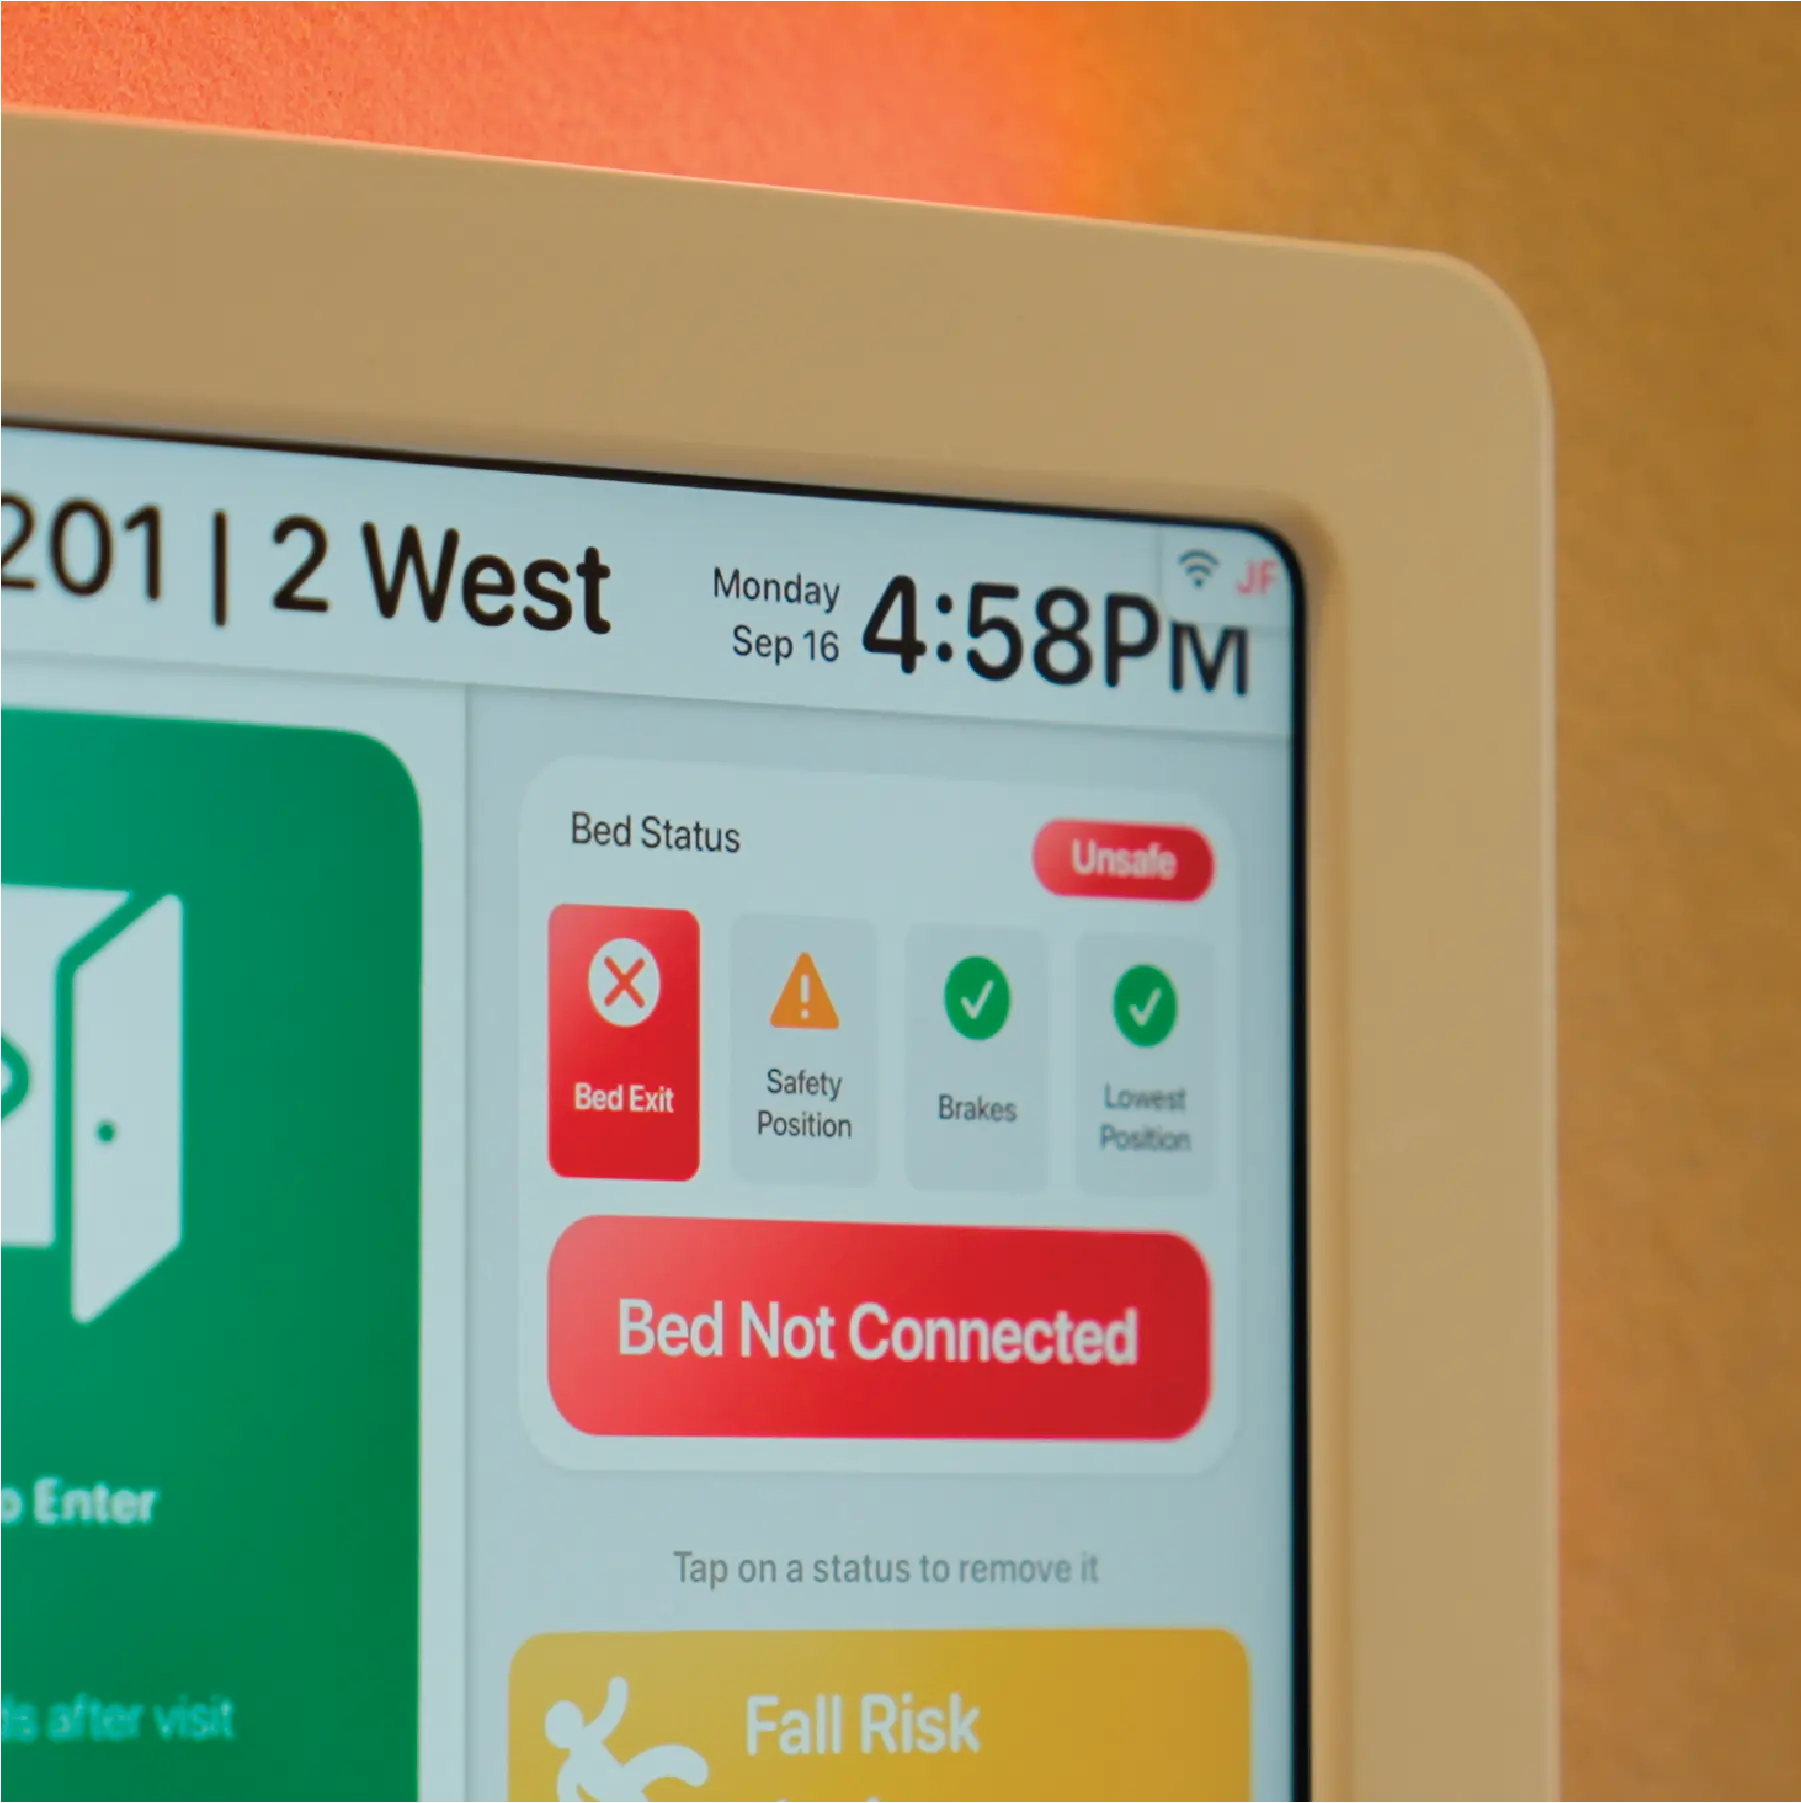
Full bed & patient status awareness for predictive notification

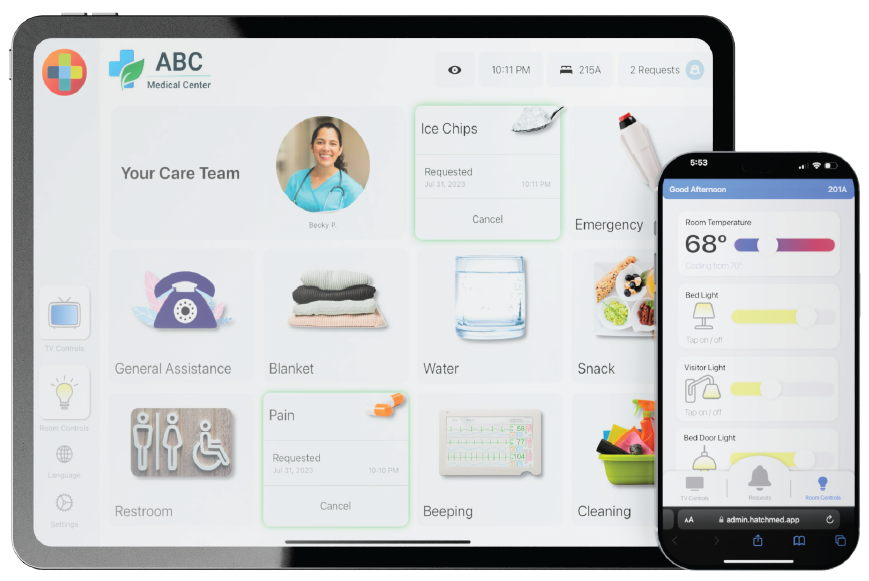
Flexible partner software integration
Which iPads work with HallMonitor?
iPad 10th & 11th Gen (Standard)
Which EHR systems are supported?
Most EMR systems are compatible with HallMonitor – Epic, Cerner, Allscripts, Athenahealth and others.
How is HallMonitor powered?
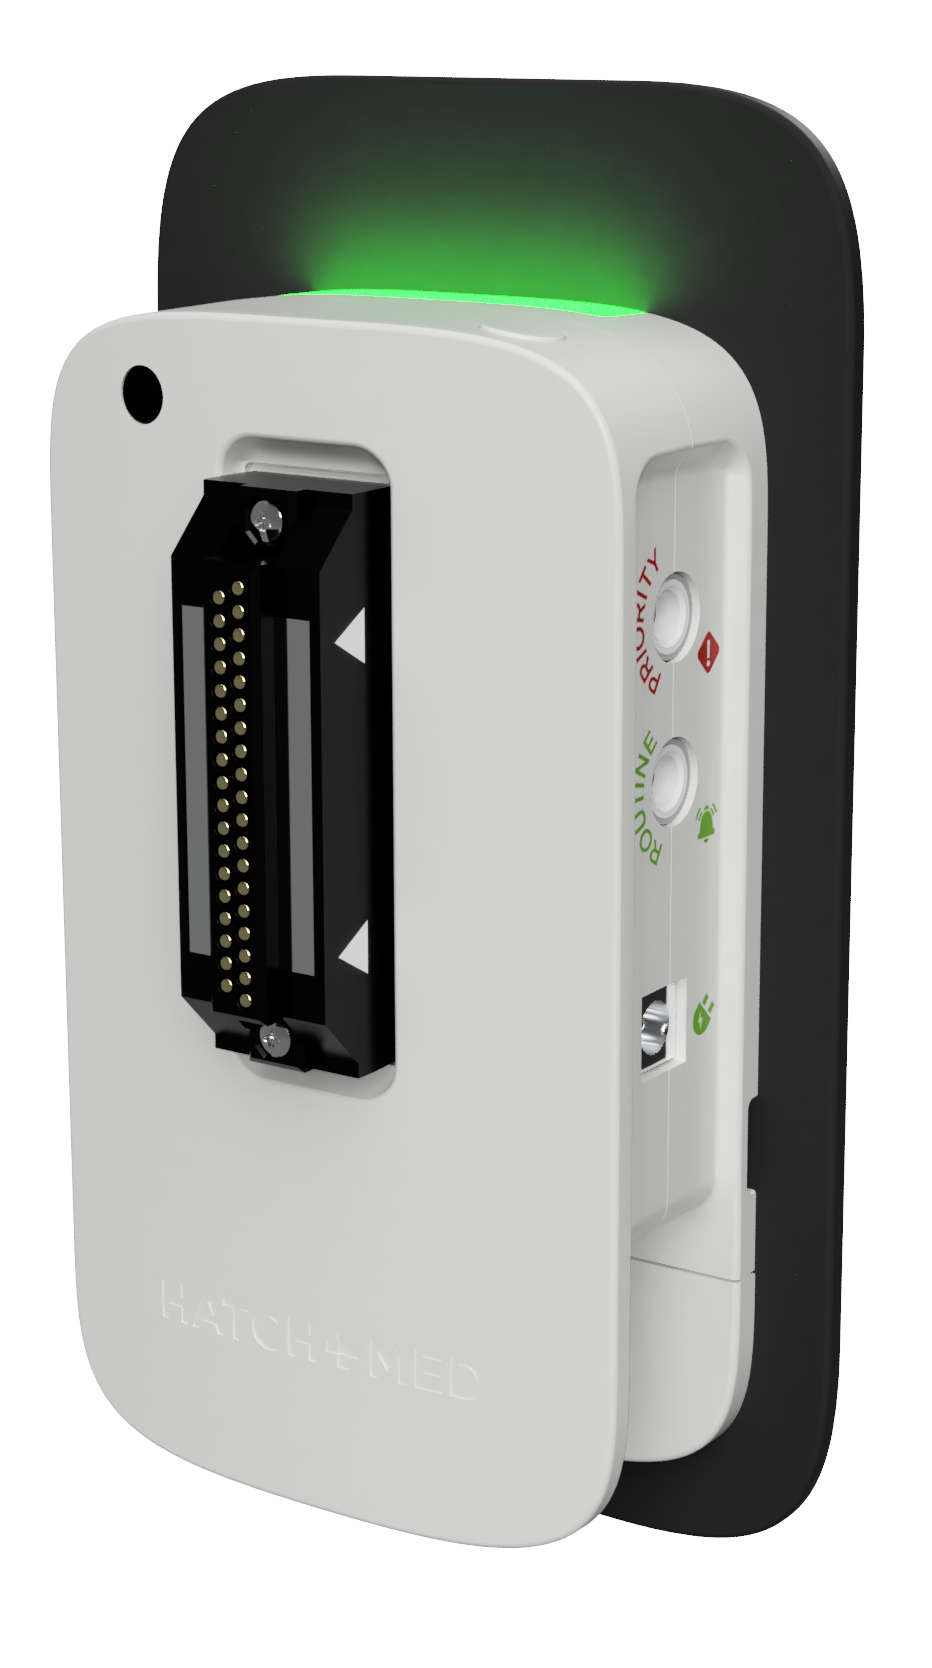
A single PoE+ connection is all that’s required to power the lights and the iPad. Alternatively a 12V connection can be used if wired Ethernet is not required.
Which software does HallMonitor work with?
HallMonitor is built around HatchMed’s native ComCierge digital signage & workflow app, but also has full support for patient engagement & EMR apps such as Epic, eVideon, GetWell, Lana Health and Pcare.
What are the customization options?
HallMonitor is fully customizable — from enclosure color, finish, and number plate design to font and room number style. Software is tailored to match existing workflows, built to fit your hospital both visually and operationally.
How do I clean HallMonitor?
Avoid using alcohol as that can degrade the paint. Standard hospital surface wipes work best, be sure to wipe off excess residue to avoid it building up over time.
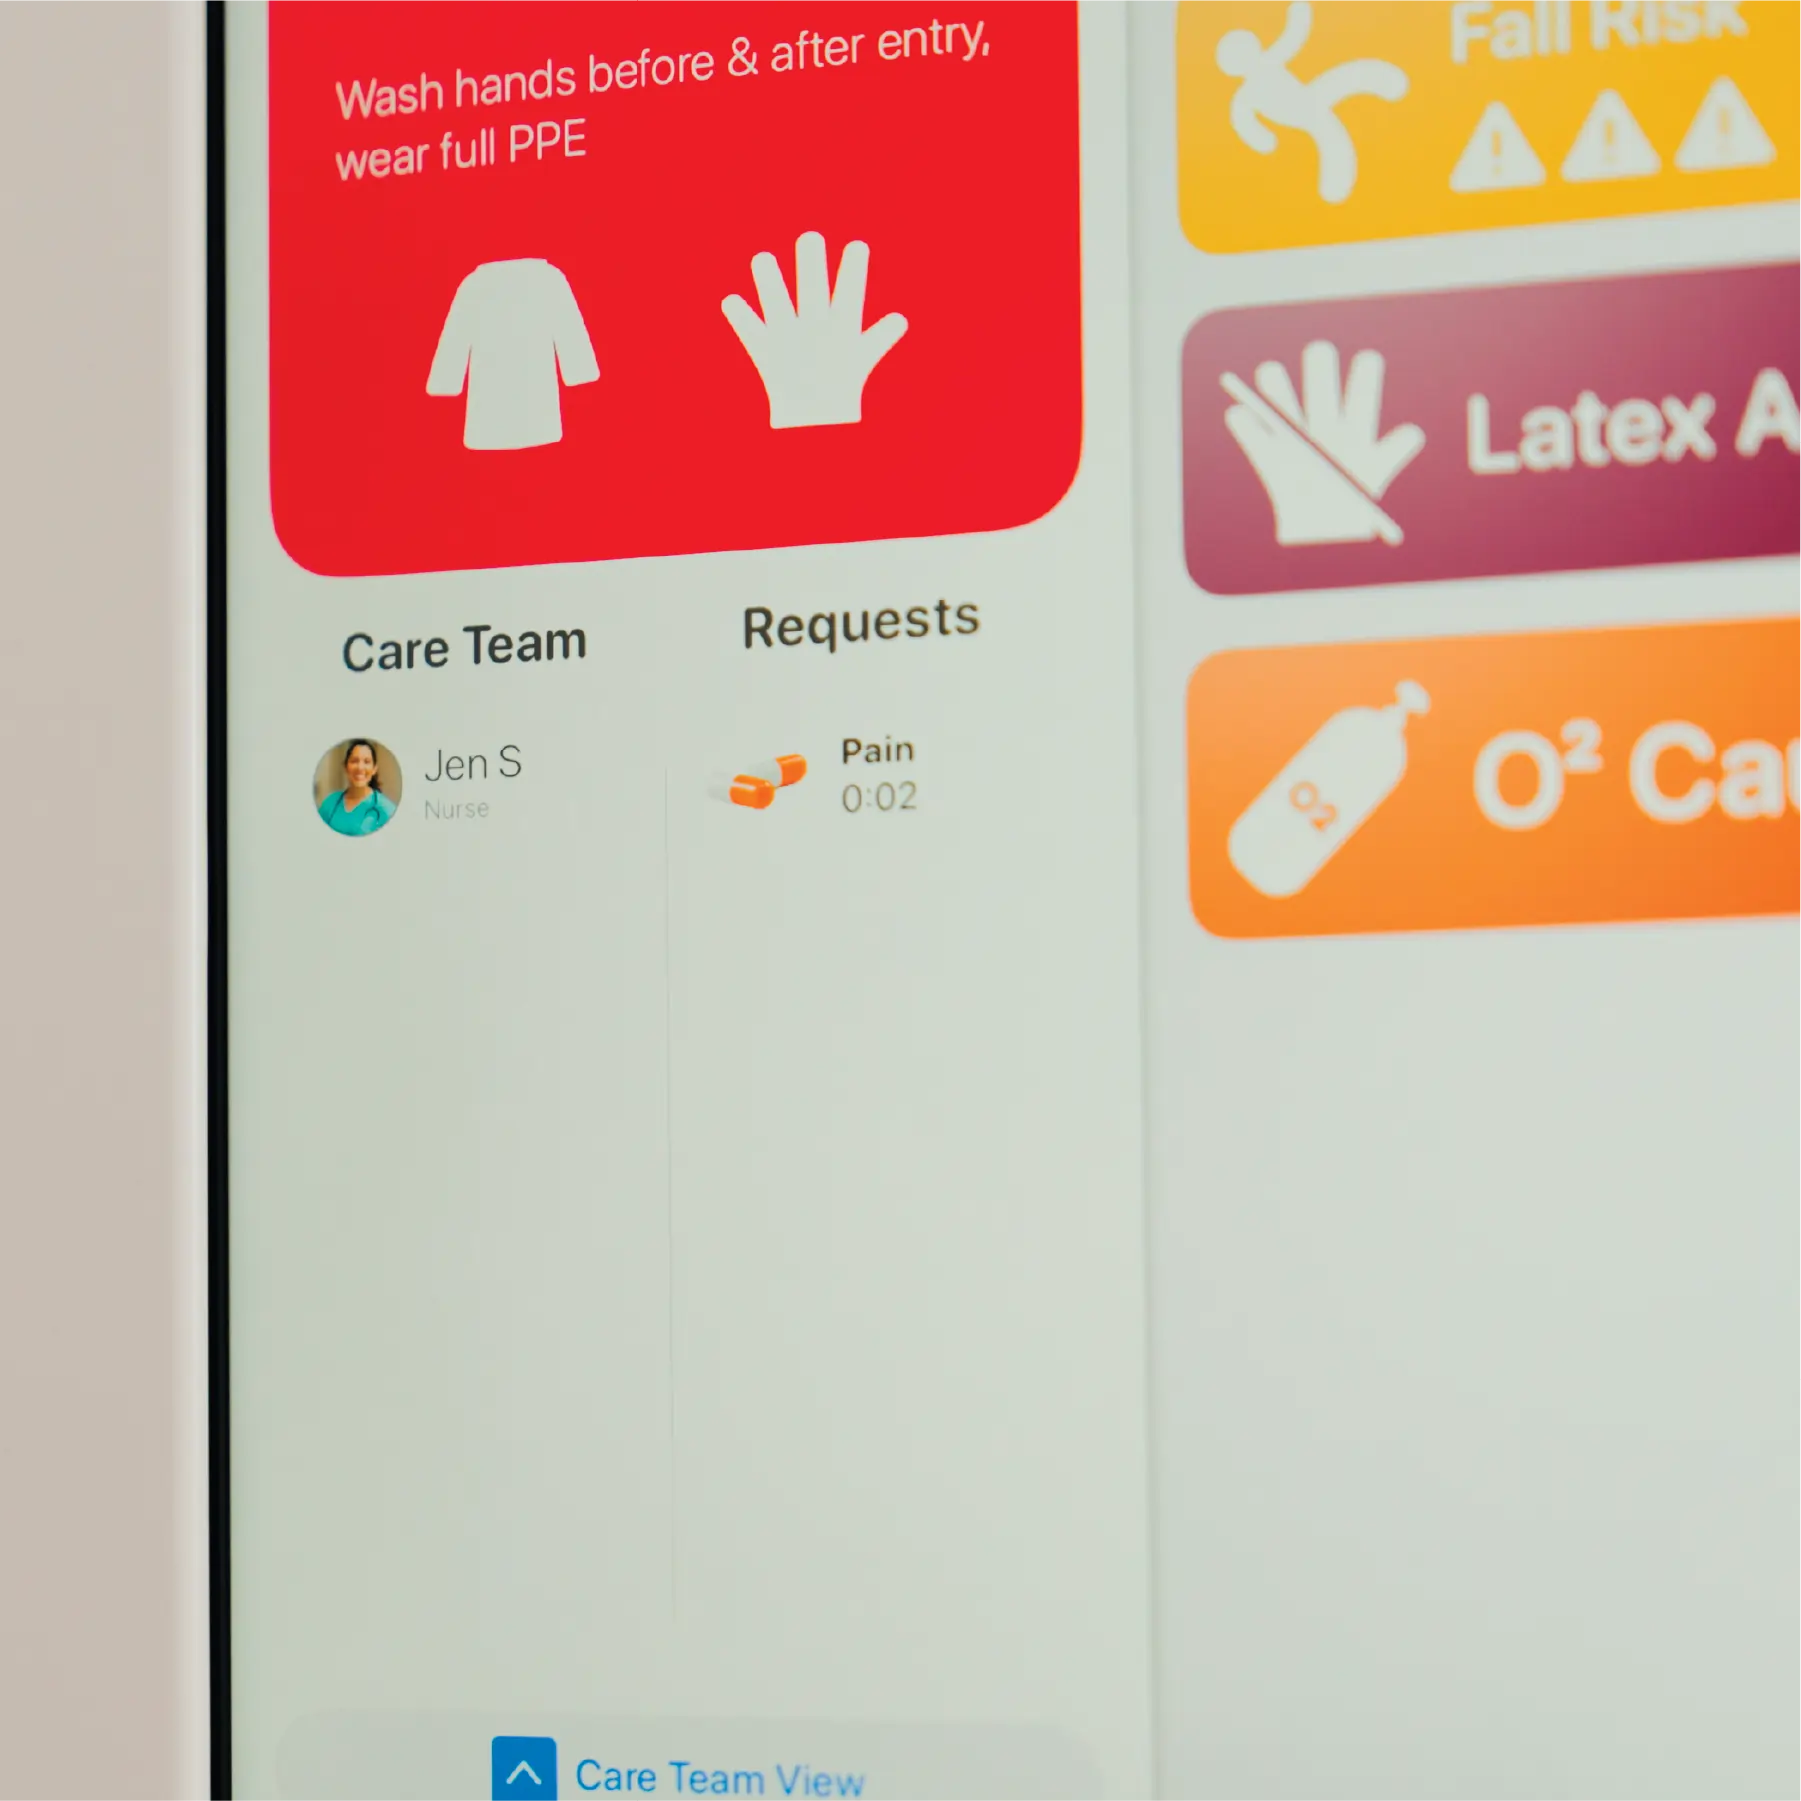
Can I display my own custom alerts?
Yes, each alert can have its title, color, text, priority and icon edited.
What is the LED illumination used for?
HallMonitor LEDs answer the question of “does the patient need your attention right now”?
They deliver meaningful illumination tied to real-time patient and room status — from fall risk and isolation types to in-room presence, bed disconnects, or even rounding reminders. They’re fully customizable per unit and EMR-connected, helping reduce alarm fatigue by highlighting only what matters, when it matters.
Supported iPads
iPad 10th & 11th Gen (Standard)
Weight
2.0 lb (without iPad)
3.1 lb (with iPad)
Dimensions
8.07” W x 12.77” H x 0.91” D (Vertical)
11.43” W x 10.00” H x 0.93” D (Horizontal)
Connection & Charging
12V @ 3A (WiFi & power)
Power Draw
Peak: ~20W (iPad fast charging)
Standard operation: ~15W
Materials
UV resistant painted ABS body & Lexan illumination panels
Illumination
RGBW LED panels on all sides, support for varied brightness and patterns
iPad Features
WiFi, Bluetooth, cameras, speakers, microphones and screen not affected
RFID Badge Reader
HID OMNIKEY module
Supports most staff & ID badges
Regulatory
UL/cUL IEC 62368-1:2014 & FDA Registered Medical Device, Class II Exempt
Patents
US20210051223A1
US20220051532A1
Start by mounting the PoE+ splitter outside the patient room, approximately 55” above the floor, making sure the location allows space for the HallMonitor enclosure to install directly over it. If required by code, install a 2-3/4” deep single gang back box in a 2” x 3” cutout.
Connect the PoE+ cable to the back of the splitter and secure it into the wall. Mount the HallMonitor back panel over the splitter, ensuring the splitter is centered in the cutout. Use wall anchors if installing into drywall.
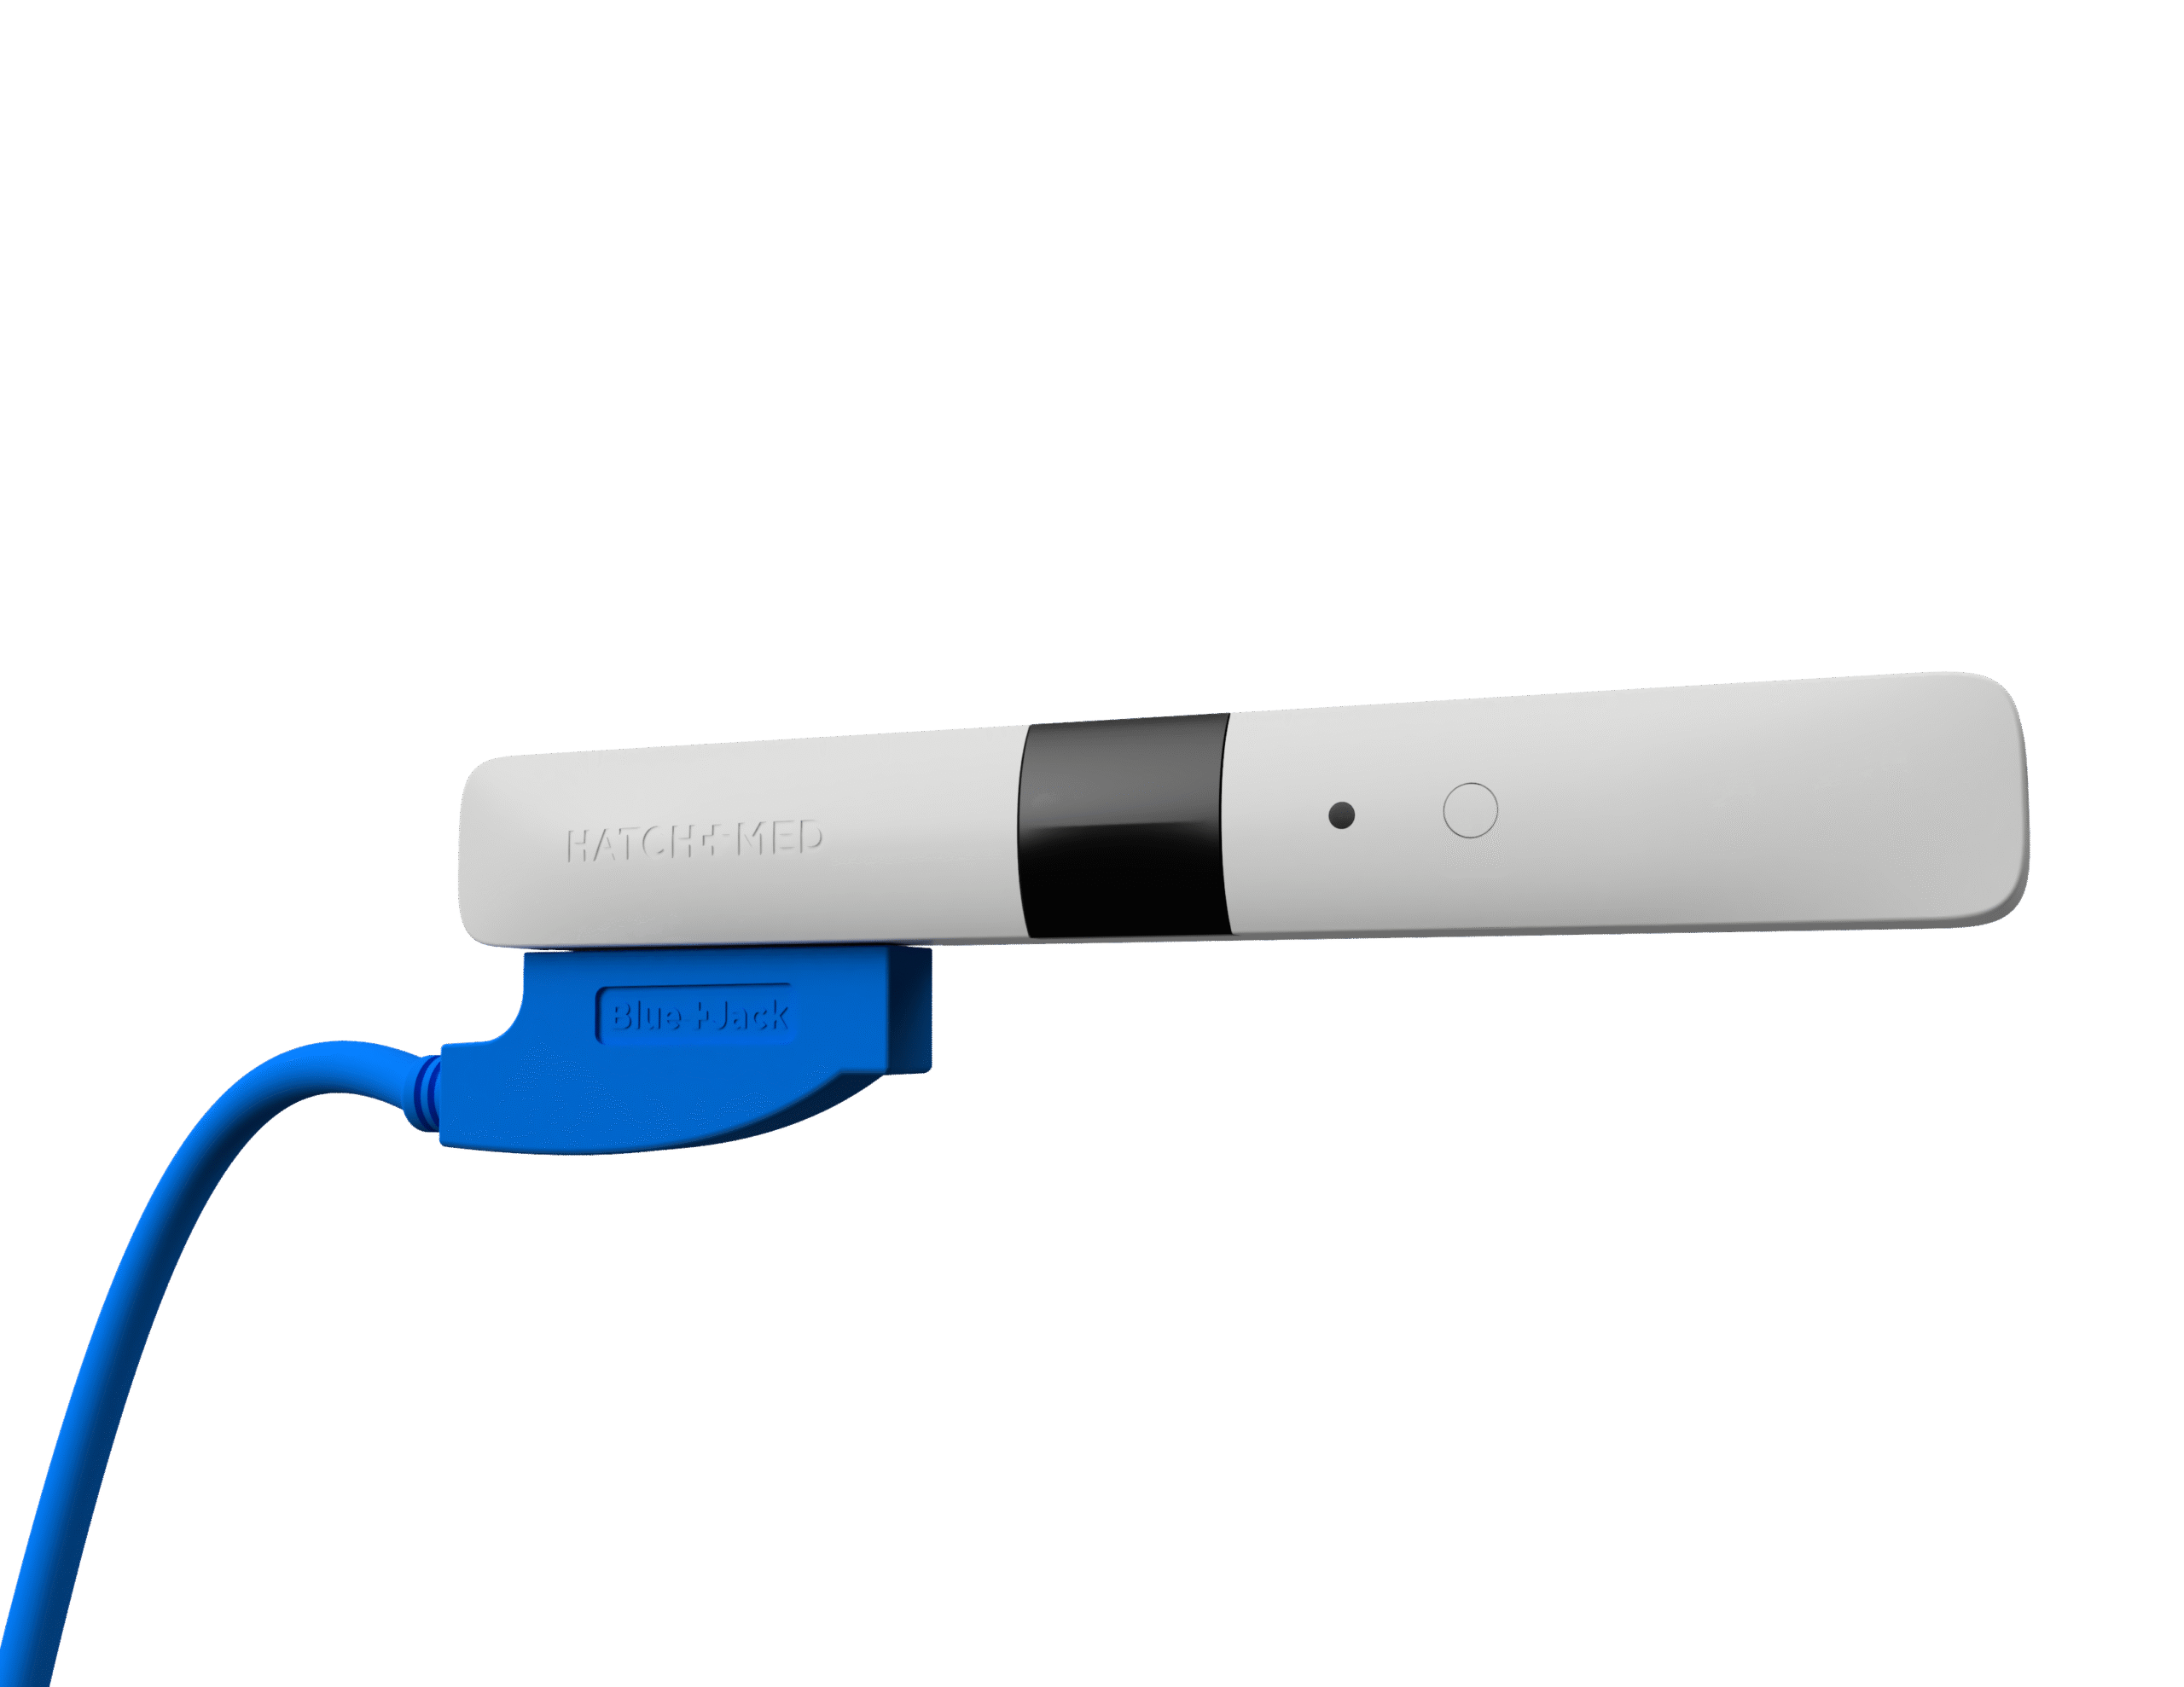
Plug the blue USB-C cable into the left (blue) port and the green USB-C cable into the right (green) port on the splitter. Adjust the cable length gently as needed. The LEDs should now illuminate a soft white.
Press the iPad into the back panel and connect the charging cable. The iPad should begin charging and connect to wired Ethernet. Slide the front cover on at a downward angle and rotate into place. Secure using the two screws provided at the bottom.
Note: PoE+ splitter may also be powered via a 12V 3A supply, however the iPad will be limited to Wi-Fi.
Which iPads work with HallMonitor?
iPad 10th & 11th Gen (Standard)
Which EHR systems are supported?
Most EMR systems are compatible with HallMonitor – Epic, Cerner, Allscripts, Athenahealth and others.
How is HallMonitor powered?
A single PoE+ connection is all that’s required to power the lights and the iPad. Alternatively a 12V connection can be used if wired Ethernet is not required.
Which software does HallMonitor work with?
HallMonitor is built around HatchMed’s native ComCierge digital signage & workflow app, but also has full support for patient engagement & EMR apps such as Epic, eVideon, GetWell, Lana Health and Pcare.
What are the customization options?
HallMonitor is fully customizable — from enclosure color, finish, and number plate design to font and room number style. Software is tailored to match existing workflows, built to fit your hospital both visually and operationally.
How do I clean HallMonitor?
Avoid using alcohol as that can degrade the paint. Standard hospital surface wipes work best, be sure to wipe off excess residue to avoid it building up over time.
Can I display my own custom alerts?
Yes, each alert can have its title, color, text, priority and icon edited.
What is the LED illumination used for?
HallMonitor LEDs answer the question of “does the patient need your attention right now”?
They deliver meaningful illumination tied to real-time patient and room status — from fall risk and isolation types to in-room presence, bed disconnects, or even rounding reminders. They’re fully customizable per unit and EMR-connected, helping reduce alarm fatigue by highlighting only what matters, when it matters.
Supported iPads
iPad 10th & 11th Gen (Standard)
Weight
2.0 lb (without iPad)
3.1 lb (with iPad)
Dimensions
8.07” W x 12.77” H x 0.91” D (Vertical)
11.43” W x 10.00” H x 0.93” D (Horizontal)
Connection & Charging
12V @ 3A (WiFi & power)
Power Draw
Peak: ~20W (iPad fast charging)
Standard operation: ~15W
Materials
UV resistant painted ABS body & Lexan illumination panels
Illumination
RGBW LED panels on all sides, support for varied brightness and patterns
iPad Features
WiFi, Bluetooth, cameras, speakers, microphones and screen not affected
RFID Badge Reader
HID OMNIKEY module
Supports most staff & ID badges
Regulatory
UL/cUL IEC 62368-1:2014 & FDA Registered Medical Device, Class II Exempt
Patents
US20210051223A1
US20220051532A1
Start by mounting the PoE+ splitter outside the patient room, approximately 55” above the floor, making sure the location allows space for the HallMonitor enclosure to install directly over it. If required by code, install a 2-3/4” deep single gang back box in a 2” x 3” cutout.
Connect the PoE+ cable to the back of the splitter and secure it into the wall. Mount the HallMonitor back panel over the splitter, ensuring the splitter is centered in the cutout. Use wall anchors if installing into drywall.
Plug the blue USB-C cable into the left (blue) port and the green USB-C cable into the right (green) port on the splitter. Adjust the cable length gently as needed. The LEDs should now illuminate a soft white.
Press the iPad into the back panel and connect the charging cable. The iPad should begin charging and connect to wired Ethernet. Slide the front cover on at a downward angle and rotate into place. Secure using the two screws provided at the bottom.
Note: PoE+ splitter may also be powered via a 12V 3A supply, however the iPad will be limited to Wi-Fi.